I don't drink soft drinks (no coke or lemonade for me, thanks!) and I stay away from energy drinks - they make my teeth tingle with the amount of sugar in them. But I love ginger beer. In the heat of summer I can think of nothing better than to relax with a chilled glass of refreshing ginger beer. And it is so easy to make! There are a number of different recipes around, and this is the second recipe I have tried (forgot to post the first but will do so later). I also didn't take photos.
This recipe came from a recipe book compiled by Waitakere Primary School, where each student submitted a family recipe. The book is called Waitakere On A Plate, and is full of family favourites - mains, salads, desserts, biscuits, cake, hot puddings, drinks, and preserves. It is a fabulous recipe book.
GINGER BEER
For the plant:
2 tsp ground ginger
2 tsp sugar
2 cups lukewarm water
1 tsp yeast
To start the plant, put all ingredients into a large glass jar and feed daily with 1 tsp ground ginger and 1 tsp sugar. You should see small bubbles rising up from the bottom of the jar after a few days. After 7 days, make up the ginger beer.
For the ginger beer:
4 cups sugar
4 cups boiling water
juice of 3 lemons
3.5 litres of water
strained liquid of the plant
To make the ginger beer, mix all ingredients together and pour into bottles, ensuring that you leave 4-5cm betwee the top of the liquid and the lid. Use plastic soft drink bottles as they can expand. Glass does not expand as the gas builds up and then is more likely to explode - which is something you probably don't want to happen (well, you could experiment with one glass bottle and see how it goes, just for the fun of it). Leave bottles for at least one week before drinking. Keep and eye on the pressure that builds up in the bottles and open carefully as they can get very fizzy!
Let a little pressure out from time to time if the bottles feel very hard. Every time you make this recipe it will be a little different.
I made this ginger beer in the middle of summer, and the garage got very hot - so my flatmate and I opened up the first bottle after 3-4 days and it was fine to drink. By the time I got to the last bottle, however, it had been sitting in the garage for maybe two weeks, and tasted a bit bitter - but I also think it had started to become a bit alcoholic, as I felt quite light headed after drinking it. Will need to experiment further with this.
Sunday, 26 April 2015

Sunday, 2 February 2014
celebrating Valentines Day for my single friends!
Valentines Day is coming up soon. Traditionally I hate Valentines Day, partly because I think that it is very commercialized and a marketing ploy and I feel that romance should come from the heart and not have to cost money; but also more so because I am 41 years old and I have never once received anything for Valentines Day. I have spent most of my life as a single woman and there is nothing quite like Valentines Day to make one feel so unloved and so lonely.

Anyway, the other day I started toying with the idea of making some mini books, and thinking about different shaped books. I thought a heart shape book would be pretty cool ... then I thought how wonderful it would be to make some heart shaped mini books and send them anonymously to my single friends, so that they would feel loved and know that someone was thinking of them!

So I got to work making a stencil, cutting out my base shapes out of pink and red card, and rummaging through my stash of pretty papers for suitable papers to decorate with. To create a heart shaped stencil, it is best to fold the card in half and draw half a heart shape on it, that way it is even on both sides. I used 4 heart shapes per book, so that it opens out into a flower shape. (3 works fine too).

Once you have your hearts cut out, start decorating them!


You might like to use stamps and quotes as well. I created poems using words and phrases that I had cut out of an old children's book that I picked up for 50c. I got some of my pictures out of children's books too.

I like cutting up paper doilies and adding bits of lace to give an old fashioned feel to them.


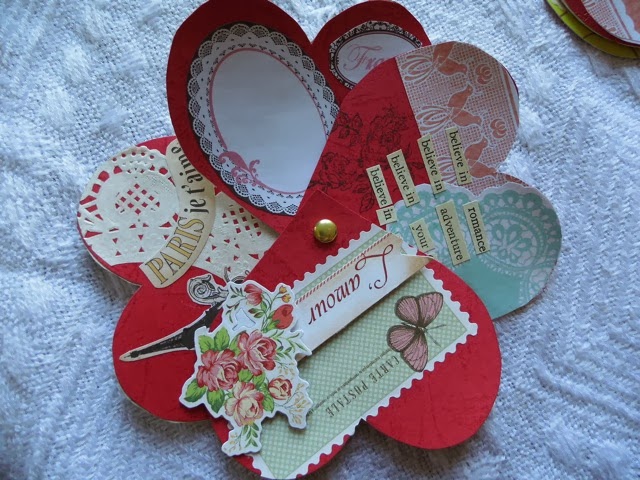

Anyway, the other day I started toying with the idea of making some mini books, and thinking about different shaped books. I thought a heart shape book would be pretty cool ... then I thought how wonderful it would be to make some heart shaped mini books and send them anonymously to my single friends, so that they would feel loved and know that someone was thinking of them!
you will need: card (I used a combination of red card and pink card with gerberas printed on it)
brads
selection of papers
selection of stamps and ink
glue
scissors
So I got to work making a stencil, cutting out my base shapes out of pink and red card, and rummaging through my stash of pretty papers for suitable papers to decorate with. To create a heart shaped stencil, it is best to fold the card in half and draw half a heart shape on it, that way it is even on both sides. I used 4 heart shapes per book, so that it opens out into a flower shape. (3 works fine too).
Once you have your hearts cut out, start decorating them!
You might like to use stamps and quotes as well. I created poems using words and phrases that I had cut out of an old children's book that I picked up for 50c. I got some of my pictures out of children's books too.
I like cutting up paper doilies and adding bits of lace to give an old fashioned feel to them.
Decorate the fronts and backs of each heart.
I put a little pocket / envelope on a few hearts, so that I could put in a little note to that person telling them how special they were.
Once you have decorated your hearts, put 4 of them together and line them up. Make a hole in the bottom of them and put the brad through to attach them together.
Voila! Gorgeous heart shaped mini books to surprise your single and special friends with!
I hope my friends like them! (I can't post pics on Facebook in case they see and then they will know it is from me, but I don't think they follow my blog so it is safe to post pics here).
Friday, 15 November 2013
Nurturing a culture of creativity at home
Welcome to Week One of the month-long Carnival of Creative Mothers to celebrate the launch of The Rainbow Way: Cultivating Creativity in the Midst of Motherhood
by Lucy H. Pearce.
Today's topic is Nurturing a Culture of Creativity at Home. Be sure to read to the end of this post to find a list of links to the other carnival participants.
Join the Carnival and be in with a chance to win a free e-copy of The Rainbow Way!
November 27th: Creative Heroines.
December 4th: Creative Inheritance.
December 11th: The Creative Process.
**********
I grew up in a crafty, creative home, although I didn't consciously know it at the time. It was just what we did, how things were. My mum made our clothes for my sisters and I; Dad painted the house(s), worked on the car, and both Mum and Dad decorated all the houses that we lived in, painting and papering, Mum making curtains and re-upholstering chairs. I have fond childhood memories of mum spending her evenings working on her tapestries or rugs, while my sisters and I lay at her feet, untangling bunches of wool that were all knotted together. Mum crocheted a poncho for each of us, and I loved it and wore mine all the time. We had hand-knitted jumpers every winter, along with handmade pink flannel pyjama's, which were really special because my pyjama's had Bee Buttons on them, and my mum really hates buttons. We never had buttons on our clothes growing up (apart from those pink pyjamas).
My mum was a stay-at-home mum while we were small, and to support us, she made things to sell. She had a knitting machine on which she made jumpers, which she sold in a local shop. She made soft toys, which she sold in a friend's home-based cafe. I used to eye up her toys that would disappear in their clear plastic bags out of the door, and wish that I could have one. My sister once smuggled one under her bed (it was a pink toy elephant).
Mum also made and sold Wombles, which were beautiful. I remember a car trip up to the Bay of Islands when I was 2-3 years old (I vomited in the car and cried), and then when we arrived at our motel, there was a Womble on my bed, waiting for me! That was the highlight of my trip - my very own Womble! I don't know what happened to it, I think we left it behind when we moved to England a few years later. But I remember that feeling of excitement when I saw that Womble and realised it was for me. I felt special.
I remember vividly the excitement I felt opening up a parcel that arrived for me from Grandma (mum's mum). I was 7 years old, sitting on the stairs, when the postal flap in the door lifted up and a parcel was pushed through, with my name on it! The feeling of anticipation, as I unwrapped the brown paper and pulled off the string, revealing a cereal box that had been folded down to keep its' precious contents safe... and inside it was Lucinda. Lucinda the rabbit, handmade with white fur, the inside of her ears lined with pink satin, wearing a blue and white check cotton dress and white cotton bloomers underneath. Made with love, especially for me. I still have Lucinda, perhaps not quite so white, and the bloomers have lost their elasticity so they don't stay up any more. But she is still so special to me and reminds me of what a special person Grandma Peg was. I loved going to Grandma's place. She had a big plastic 2 litre container under the stairs, full of buttons. Big buttons, little buttons, old buttons, pink buttons, wooden buttons, plastic buttons... my sisters and I would open up that dark little door under the stairs, poke our heads inside, and come out triumphantly holding that box of buttons and tip it out all over the floor. We made button gardens, button flowers, patterns, houses, and pictures. Grandma painted, and sometimes she took me to her art class. I remember being 9 years old, sitting outside near a river on a sunny day, alongside lots of old people with their easels and paints, and me with my own little wooden tray and watercolour pad and paints, sitting next to Grandma and chatting away and drawing and painting. Everyone said nice things about my efforts. I remember feeling content - I was doing something special with my Grandma, and we were doing something that we both enjoyed.
Grandma taught me about the magic of wax resist - using crayons and then watercolours over the top. She showed me how to do wax rubbings - put a piece of paper over a coin, or any textured item, and rub a crayon over the top. Grandma took us to the Birmingham Art Gallery every time we visited. I grew up looking at beautiful famous paintings. I was fascinated with the paintings of nudes, and I once told Dad they were rude. I can't remember Dad's response, but it would have been something like "that is just what people look like". I remember sitting at school one day and we had to draw people. I drew people like I saw at the Birmingham Art Gallery, and put nipples on my people. Other kids looked at my drawings and called me rude. I was made to feel embarrassed and ashamed of my art, and I didn't put nipples on people for a very long time after that. Looking back, I think that those kids are the ones that didn't understand. I wasn't being rude, I was being real. 40 years later, I look through art books or online at famous paintings, and I see those paintings that became so familiar to me at the Birmingham Art Gallery, that I developed a connection with as a young person, and I think "I know that painting. That painting is like an old friend to me".
We didn't have lots of money growing up, but I didn't notice. Our home was full of love, full of experiences. We spent our days climbing the local hills, playing cowboys and Indians, riding our bikes, making daisy chains, making paper beads and turning them into necklaces, making huts under the table using old sheets on rainy days. We put on circus plays and magic shows that we made our parents and our friends' parents watch. We went to the beach and dug really deep holes and made huge sandcastles. and sand sculptures. My sisters and I spent many pleasurable hours cutting out bits of paper and sticking them down in our scrapbooks. We loved catalogues, and would cut out pictures from them to paste down. One of my favourite christmas presents was a Rolf Harris Art Station that was stuffed in my Santa's stocking one year, and a weaving loom another year. I still have that weaving loom, it sits upstairs in my craft room. I will be using it with my niece's and nephews.
My aunt, (my mum's sister) is also a crafter. She makes boxes, quilts, paper, books, and so much more. Over the years I have seen my mum take up many different crafts... ceramics, faberge eggs, stamping, card making, and now quilting. I only have to look in my china cabinet to see the products of her many crafts and hobbies - a black ceramic horse she made for me when I was 16; a velvet lined egg she made for me one easter. In my china cabinet are also products of my own crafting - handpainted egg shells; a miniature handpainted ceramic tea set; handpainted wine glasses. On the top of the cabinet sits needle felted things that I have made - a fantail, a horse, a donkey, a kereru. On my walls are paintings I have done over the years. In my wardrobe are clothes that I have made (not many, but a few), and jumpers that my mum still makes for me. I am also lucky enough to be the beneficiary of her crafts that she doesn't do anymore - I rummage through her things and find stamps and inks that I am allowed to take home and use in my crafting.
I have a cuttlebug, and a variety of stamps and scissors and inks. My 4 year old nieces and 5 year old nephew love coming to visit (or sometimes I bring it to them) and we spend a wonderful afternoon together just creating. I see the wonder in their faces when they carefully put the paper into an embossing folder, turn the handle, and take out the paper to reveal bumpy patterns and flowers, just like magic. They love dipping the stamps into the inkpads and pressing them down on the paper and finding a butterfly or a fairy sitting there on their page. They get excited when using special scissors which cut wavy lines and zig zag lines - they cut into paper just for the pleasure of seeing a zigzag splitting the paper into two. They use the craft punches in ecstasy, gleefully punching out hundreds of dragonflies and butterflies and hearts. We are creating lifelong memories, and at the same time imparting to them a love of creating, which teaches them to be self-reliant. There is an innate feeling of satisfaction, pride and contentment that comes with creating. When my niece turned 4 years old, I made her a Creation Station box - I covered a filing box with pretty papers, and filled it with a $2 pack of A4 coloured paper (some sheets of which I had cut down to A5 and A6) an A5 pad of pretty printed paper for $2, an $8 stamp set, a gluestick, and a variety of coloured card and envelopes from my paper stash. I filled little boxes with sequins, and paper butterflies, dragonflies and hearts punched out with my craft punch. I used my cuttlebug and die cut a variety of doilies, bird houses and other various items; and embossed paper. It was so much fun to make, and I enjoyed finding little things to add to it, and I know that my niece will have hours of fun with it. My youngest sister saw the treasure box full of crafting goodies and put in an order for her daughter's next birthday!
Sometimes I look around me as an adult and I despair a little as I hear kids talk about what their mum or dad is going to buy them or have bought them, rather than what they did. They talk about what they saw on TV, not what they made. I think about what it was like when I was a kid and wonder if it is possible to bring up kids today without being materialistic. I think, "yes it is possible". Material things are not important and so easily discarded - but those things that have been handmade especially for me, by someone special to me, retain their significance, because they are so much more than just a 'thing' to be discarded. Creativity in the home is just something that I do, it is completely natural, because every day I am creating, whether it is in the kitchen, in the lounge, in my head, or in my craftroom. **********
Carnival host and author of The Rainbow Way, Lucy at Dreaming Aloud shares an extract from the chapter Nurturing a Family Culture of Creativity.
Lilly Higgins is a passionate food writer. Now a mother of two boys, she's discovered a new calling: to instil in them a love of food and creativity in the kitchen.
DeAnna L'am shares how visioning the New Year with your child is an invitation to be inspired: use creativity and resolutions to create a fun road map for the year ahead.
Molly at Talk Birth on Releasing Our Butterflies - balancing motherhood with creativity.
Laura shares some of the creativity happening at Nestled Under Rainbows and a few thoughts about creativity.
Georgie at Visual Toast celebrates her own unique culture of creativity at home.
Esther at Nurtureworkshop spreads the love of the ordinary, the delights of everyday things that can be an adventure of the imagination.
For Dawn at The Barefoot Home creativity is always a free form expression to be shared by all in a supportive environment where anything can be an art material.
Naomi at Poetic Aperture is a mother, artist and photographer who tries to keep her daughter away from the expensive pens and paints.
Aimee at Creativeflutters writes about keeping your sanity and creativity intact with small kids in the house in her post: Mother + Creativity - They Must Coexist.
Amelia at My Grandest Adventure embarks on a 30 Days of Creativity challenge...you can too!
Becky at Raising Loveliness explores creating with her smaller family members.
Jennifer at Let Your Soul Shine reveals how children help us connect to our souls, through music and movement.
Mary at The Turquoise Paintbrush shares her experiences of creating with kids.
Brooke at violicious spent too much time worrying and trying to be creative instead of letting it flow.
Joanna at Musings of a Hostage Mother explains why creativity at home is important to her in her post "I nurture a creative culture."
On womansart blog this week - nurturing a creative culture at home.
Creative woman at Creator's Corner loves color and uses it to paint, draw and decorate to inspire herself and her family.
It took until Amy at Mama Dynamite was pregnant aged 35 to discover her dormant creative streak - she has found lovely ways of tuning into it every since.
Anna of ArtBuds is a trained educator and art therapist. She has been creating all her life and nurturing her daughter's creativity at home is a priority.
Deb at Debalicious shares how her family enjoy creativity at home.
Emily at The Nest explores how creativity runs through her family's life together.
Jennifer at OurMuddyBoots sees that encouraging creativity in children is as simple as appreciating them for who they are: it just means overriding everything we know!
Lisa from Mama.ie has discovered that a combination of writing and traditional crafts can provide a creative outlet during those busy early years of new motherhood.
Anna at Biromums shares what nurturing a culture of creativity means to her.
Zoie at TouchstoneZ argues that the less they are interfered with, the more creative children become as they grow up.
Darcel at The Mahogany Way celebrates creating with her kids.
Molly at MollyLollyLoo explores her family's shared creative times.
Liz at Reckless Knitting shares how she celebrates creativity with her family.
Sally (aka The Ginger Ninja) of The Ginger Chronicles is continually inspired by her own mum and grandmother.
Just being creative is enough, says Nicki at Just Like Play, as she ponders her journey of nurturing a creative family.
Allurynn shares her creative family's musings in her post "Creativity... at the Heart of it" on Moonlight Muse.
Laura at Authentic Parenting explores how being creative saves her sanity.
Mama is Inspired talks about how she puts an emphasis on the handmade in her home, especially in the holiday season.
Kirstin at Listen to the Squeak shares with you several easy ways for busy mamas and dads to encourage their children to be creative every day.
Chiswick Mum believes that a healthy dose of chaos is the secret to nurturing creativity at home.
Mila at Art Play Day always lived in her dreams, sleepwalking through life ... now she is finding out what creativity is all about.... her inner child!
Sadhbh at Where Wishes Come From describes how picture books can nurture creativity in young children.
by Lucy H. Pearce.
Today's topic is Nurturing a Culture of Creativity at Home. Be sure to read to the end of this post to find a list of links to the other carnival participants.
Join the Carnival and be in with a chance to win a free e-copy of The Rainbow Way!
November 27th: Creative Heroines.
December 4th: Creative Inheritance.
December 11th: The Creative Process.
**********
I grew up in a crafty, creative home, although I didn't consciously know it at the time. It was just what we did, how things were. My mum made our clothes for my sisters and I; Dad painted the house(s), worked on the car, and both Mum and Dad decorated all the houses that we lived in, painting and papering, Mum making curtains and re-upholstering chairs. I have fond childhood memories of mum spending her evenings working on her tapestries or rugs, while my sisters and I lay at her feet, untangling bunches of wool that were all knotted together. Mum crocheted a poncho for each of us, and I loved it and wore mine all the time. We had hand-knitted jumpers every winter, along with handmade pink flannel pyjama's, which were really special because my pyjama's had Bee Buttons on them, and my mum really hates buttons. We never had buttons on our clothes growing up (apart from those pink pyjamas).
My mum was a stay-at-home mum while we were small, and to support us, she made things to sell. She had a knitting machine on which she made jumpers, which she sold in a local shop. She made soft toys, which she sold in a friend's home-based cafe. I used to eye up her toys that would disappear in their clear plastic bags out of the door, and wish that I could have one. My sister once smuggled one under her bed (it was a pink toy elephant).
Mum also made and sold Wombles, which were beautiful. I remember a car trip up to the Bay of Islands when I was 2-3 years old (I vomited in the car and cried), and then when we arrived at our motel, there was a Womble on my bed, waiting for me! That was the highlight of my trip - my very own Womble! I don't know what happened to it, I think we left it behind when we moved to England a few years later. But I remember that feeling of excitement when I saw that Womble and realised it was for me. I felt special.
I remember vividly the excitement I felt opening up a parcel that arrived for me from Grandma (mum's mum). I was 7 years old, sitting on the stairs, when the postal flap in the door lifted up and a parcel was pushed through, with my name on it! The feeling of anticipation, as I unwrapped the brown paper and pulled off the string, revealing a cereal box that had been folded down to keep its' precious contents safe... and inside it was Lucinda. Lucinda the rabbit, handmade with white fur, the inside of her ears lined with pink satin, wearing a blue and white check cotton dress and white cotton bloomers underneath. Made with love, especially for me. I still have Lucinda, perhaps not quite so white, and the bloomers have lost their elasticity so they don't stay up any more. But she is still so special to me and reminds me of what a special person Grandma Peg was. I loved going to Grandma's place. She had a big plastic 2 litre container under the stairs, full of buttons. Big buttons, little buttons, old buttons, pink buttons, wooden buttons, plastic buttons... my sisters and I would open up that dark little door under the stairs, poke our heads inside, and come out triumphantly holding that box of buttons and tip it out all over the floor. We made button gardens, button flowers, patterns, houses, and pictures. Grandma painted, and sometimes she took me to her art class. I remember being 9 years old, sitting outside near a river on a sunny day, alongside lots of old people with their easels and paints, and me with my own little wooden tray and watercolour pad and paints, sitting next to Grandma and chatting away and drawing and painting. Everyone said nice things about my efforts. I remember feeling content - I was doing something special with my Grandma, and we were doing something that we both enjoyed.
Grandma taught me about the magic of wax resist - using crayons and then watercolours over the top. She showed me how to do wax rubbings - put a piece of paper over a coin, or any textured item, and rub a crayon over the top. Grandma took us to the Birmingham Art Gallery every time we visited. I grew up looking at beautiful famous paintings. I was fascinated with the paintings of nudes, and I once told Dad they were rude. I can't remember Dad's response, but it would have been something like "that is just what people look like". I remember sitting at school one day and we had to draw people. I drew people like I saw at the Birmingham Art Gallery, and put nipples on my people. Other kids looked at my drawings and called me rude. I was made to feel embarrassed and ashamed of my art, and I didn't put nipples on people for a very long time after that. Looking back, I think that those kids are the ones that didn't understand. I wasn't being rude, I was being real. 40 years later, I look through art books or online at famous paintings, and I see those paintings that became so familiar to me at the Birmingham Art Gallery, that I developed a connection with as a young person, and I think "I know that painting. That painting is like an old friend to me".
We didn't have lots of money growing up, but I didn't notice. Our home was full of love, full of experiences. We spent our days climbing the local hills, playing cowboys and Indians, riding our bikes, making daisy chains, making paper beads and turning them into necklaces, making huts under the table using old sheets on rainy days. We put on circus plays and magic shows that we made our parents and our friends' parents watch. We went to the beach and dug really deep holes and made huge sandcastles. and sand sculptures. My sisters and I spent many pleasurable hours cutting out bits of paper and sticking them down in our scrapbooks. We loved catalogues, and would cut out pictures from them to paste down. One of my favourite christmas presents was a Rolf Harris Art Station that was stuffed in my Santa's stocking one year, and a weaving loom another year. I still have that weaving loom, it sits upstairs in my craft room. I will be using it with my niece's and nephews.
My aunt, (my mum's sister) is also a crafter. She makes boxes, quilts, paper, books, and so much more. Over the years I have seen my mum take up many different crafts... ceramics, faberge eggs, stamping, card making, and now quilting. I only have to look in my china cabinet to see the products of her many crafts and hobbies - a black ceramic horse she made for me when I was 16; a velvet lined egg she made for me one easter. In my china cabinet are also products of my own crafting - handpainted egg shells; a miniature handpainted ceramic tea set; handpainted wine glasses. On the top of the cabinet sits needle felted things that I have made - a fantail, a horse, a donkey, a kereru. On my walls are paintings I have done over the years. In my wardrobe are clothes that I have made (not many, but a few), and jumpers that my mum still makes for me. I am also lucky enough to be the beneficiary of her crafts that she doesn't do anymore - I rummage through her things and find stamps and inks that I am allowed to take home and use in my crafting.
I have a cuttlebug, and a variety of stamps and scissors and inks. My 4 year old nieces and 5 year old nephew love coming to visit (or sometimes I bring it to them) and we spend a wonderful afternoon together just creating. I see the wonder in their faces when they carefully put the paper into an embossing folder, turn the handle, and take out the paper to reveal bumpy patterns and flowers, just like magic. They love dipping the stamps into the inkpads and pressing them down on the paper and finding a butterfly or a fairy sitting there on their page. They get excited when using special scissors which cut wavy lines and zig zag lines - they cut into paper just for the pleasure of seeing a zigzag splitting the paper into two. They use the craft punches in ecstasy, gleefully punching out hundreds of dragonflies and butterflies and hearts. We are creating lifelong memories, and at the same time imparting to them a love of creating, which teaches them to be self-reliant. There is an innate feeling of satisfaction, pride and contentment that comes with creating. When my niece turned 4 years old, I made her a Creation Station box - I covered a filing box with pretty papers, and filled it with a $2 pack of A4 coloured paper (some sheets of which I had cut down to A5 and A6) an A5 pad of pretty printed paper for $2, an $8 stamp set, a gluestick, and a variety of coloured card and envelopes from my paper stash. I filled little boxes with sequins, and paper butterflies, dragonflies and hearts punched out with my craft punch. I used my cuttlebug and die cut a variety of doilies, bird houses and other various items; and embossed paper. It was so much fun to make, and I enjoyed finding little things to add to it, and I know that my niece will have hours of fun with it. My youngest sister saw the treasure box full of crafting goodies and put in an order for her daughter's next birthday!
Sometimes I look around me as an adult and I despair a little as I hear kids talk about what their mum or dad is going to buy them or have bought them, rather than what they did. They talk about what they saw on TV, not what they made. I think about what it was like when I was a kid and wonder if it is possible to bring up kids today without being materialistic. I think, "yes it is possible". Material things are not important and so easily discarded - but those things that have been handmade especially for me, by someone special to me, retain their significance, because they are so much more than just a 'thing' to be discarded. Creativity in the home is just something that I do, it is completely natural, because every day I am creating, whether it is in the kitchen, in the lounge, in my head, or in my craftroom. **********
 |
- exclusive access to a private Facebook group for creative mothers - a vibrant greetings card and book-mark of one of the author's paintings. Kindle and paperback editions from Amazon.co.uk, Amazon.com, Book Depository, Barnes and Noble or order it from your local bookshop! |
Lilly Higgins is a passionate food writer. Now a mother of two boys, she's discovered a new calling: to instil in them a love of food and creativity in the kitchen.
DeAnna L'am shares how visioning the New Year with your child is an invitation to be inspired: use creativity and resolutions to create a fun road map for the year ahead.
Molly at Talk Birth on Releasing Our Butterflies - balancing motherhood with creativity.
Laura shares some of the creativity happening at Nestled Under Rainbows and a few thoughts about creativity.
Georgie at Visual Toast celebrates her own unique culture of creativity at home.
Esther at Nurtureworkshop spreads the love of the ordinary, the delights of everyday things that can be an adventure of the imagination.
For Dawn at The Barefoot Home creativity is always a free form expression to be shared by all in a supportive environment where anything can be an art material.
Naomi at Poetic Aperture is a mother, artist and photographer who tries to keep her daughter away from the expensive pens and paints.
Aimee at Creativeflutters writes about keeping your sanity and creativity intact with small kids in the house in her post: Mother + Creativity - They Must Coexist.
Amelia at My Grandest Adventure embarks on a 30 Days of Creativity challenge...you can too!
Becky at Raising Loveliness explores creating with her smaller family members.
Jennifer at Let Your Soul Shine reveals how children help us connect to our souls, through music and movement.
Mary at The Turquoise Paintbrush shares her experiences of creating with kids.
Brooke at violicious spent too much time worrying and trying to be creative instead of letting it flow.
Joanna at Musings of a Hostage Mother explains why creativity at home is important to her in her post "I nurture a creative culture."
On womansart blog this week - nurturing a creative culture at home.
Creative woman at Creator's Corner loves color and uses it to paint, draw and decorate to inspire herself and her family.
It took until Amy at Mama Dynamite was pregnant aged 35 to discover her dormant creative streak - she has found lovely ways of tuning into it every since.
Anna of ArtBuds is a trained educator and art therapist. She has been creating all her life and nurturing her daughter's creativity at home is a priority.
Deb at Debalicious shares how her family enjoy creativity at home.
Emily at The Nest explores how creativity runs through her family's life together.
Jennifer at OurMuddyBoots sees that encouraging creativity in children is as simple as appreciating them for who they are: it just means overriding everything we know!
Lisa from Mama.ie has discovered that a combination of writing and traditional crafts can provide a creative outlet during those busy early years of new motherhood.
Anna at Biromums shares what nurturing a culture of creativity means to her.
Zoie at TouchstoneZ argues that the less they are interfered with, the more creative children become as they grow up.
Darcel at The Mahogany Way celebrates creating with her kids.
Molly at MollyLollyLoo explores her family's shared creative times.
Liz at Reckless Knitting shares how she celebrates creativity with her family.
Sally (aka The Ginger Ninja) of The Ginger Chronicles is continually inspired by her own mum and grandmother.
Just being creative is enough, says Nicki at Just Like Play, as she ponders her journey of nurturing a creative family.
Allurynn shares her creative family's musings in her post "Creativity... at the Heart of it" on Moonlight Muse.
Laura at Authentic Parenting explores how being creative saves her sanity.
Mama is Inspired talks about how she puts an emphasis on the handmade in her home, especially in the holiday season.
Kirstin at Listen to the Squeak shares with you several easy ways for busy mamas and dads to encourage their children to be creative every day.
Chiswick Mum believes that a healthy dose of chaos is the secret to nurturing creativity at home.
Mila at Art Play Day always lived in her dreams, sleepwalking through life ... now she is finding out what creativity is all about.... her inner child!
Sadhbh at Where Wishes Come From describes how picture books can nurture creativity in young children.
Friday, 28 June 2013
Tuesday, 4 June 2013
Gingerbread
I love gingerbread, but I have never tried making it before (until now!). It turned out to be quite a dense cake, but nonetheless tasty and really good with yoghurt or custard! I had made it for a Dove Pink Ribbon morning tea I was hosting to raise funds for the Breast Cancer Foundation, and it was å successful, enjoyable morning/afternoon/whole day event!
This recipe comes from my book "All Things Nice" with Jo Seagar.
Gingerbread
125g butter
1/2 cup white sugar
1 cup treacle
1/2 cup milk
3 cups flour
1 1/4 tsp baking soda
1 heaped Tbsp ground ginger
1/4 tsp ground cinnamon
1/4 tsp ground cloves


I am lucky that my flatmate has a coffee grinder - which is perfect for grinding up fresh spices. I buy cinnamon sticks and just grind them in the coffee grinder, which gives it a wonderful fresh taste and smell. I do the same with cloves.
Preheat the oven to 160 degrees C. Line a 23cm square cake tin or small roasting dish with baking paper (I just used a round cake tin and greased it and dusted it with flour).


Heat the butter, sugar and treacle together in a saucepan until butter is just melted.

Remove the pan from the heat and stir in the milk. Cool slightly.

Sift the dry ingredients into a bowl. Make a well in the centre and tip in the liquid ingredients. Mix quickly without overmixing.

Pile the mixture into the prepared tin and bake for 45-60 minutes until the gingerbread is nicely risen and a skewer inserted into the centre comes out clean.


Cool in the tin for 10-15 minutes before tipping out onto a cake rack. Dust with icing sugar to serve.
Enjoy!
This recipe comes from my book "All Things Nice" with Jo Seagar.
Gingerbread
125g butter
1/2 cup white sugar
1 cup treacle
1/2 cup milk
3 cups flour
1 1/4 tsp baking soda
1 heaped Tbsp ground ginger
1/4 tsp ground cinnamon
1/4 tsp ground cloves


I am lucky that my flatmate has a coffee grinder - which is perfect for grinding up fresh spices. I buy cinnamon sticks and just grind them in the coffee grinder, which gives it a wonderful fresh taste and smell. I do the same with cloves.
Preheat the oven to 160 degrees C. Line a 23cm square cake tin or small roasting dish with baking paper (I just used a round cake tin and greased it and dusted it with flour).


Heat the butter, sugar and treacle together in a saucepan until butter is just melted.

Remove the pan from the heat and stir in the milk. Cool slightly.

Sift the dry ingredients into a bowl. Make a well in the centre and tip in the liquid ingredients. Mix quickly without overmixing.

Pile the mixture into the prepared tin and bake for 45-60 minutes until the gingerbread is nicely risen and a skewer inserted into the centre comes out clean.


Cool in the tin for 10-15 minutes before tipping out onto a cake rack. Dust with icing sugar to serve.
Enjoy!
Thursday, 2 May 2013
Ginger citrus marmalade!
I am really enjoying my journey on my ginger quest. I get all excited whenever I come across a recipe with ginger in it. So guess how I felt when I came across a recipe for a marmalade with ginger and lime in it! (that's right.... EXCITED!!)
This recipe came from a book called "Jams and Preserves", by Gina Steer. It is a lovely book (the tomato chutney I made a while ago came from this book too) and is one my sister gave me for my birthday. So off I went to the local market on a Saturday morning and came back with fresh limes, ginger and lemons.
Ginger Citrus Marmalade
makes about 1.3kg / 3lb

4 limes (preferably unwaxed), scrubbed
2 large lemons (preferably unwaxed), scrubbed
small piece fresh root ginger, peeled and chopped.
1.2 litres / 2 pints water
2 tsp ground ginger
about 900g / 2lb preserving sugar (see method) (I couldn't find preserving sugar, so used jam sugar instead. The type of sugar is quite important, I will explain at the end)
115g / 4oz stem ginger, chopped. (I presumed this was crystallised ginger, which was all I could find).

Cut off and discard both ends from the limes and lemons and wash thoroughly. Place in a large saucepan together with the chopped root ginger and the water. Bring to boil then reduce heat, cover with a tight-fitting lid and simmer for 1 1/2 hours, or until the fruits are very soft.

Cool slightly, then drain off liquid and reserve. Chop the fruits as finely as possible, discarding the pips.


Return the chopped fruits to the rinsed out saucepan, together with the reserved liquid and ground ginger. Add the sugar, allowing 450g/1 lb sugar for every 600ml / 1 pint of liquid. Heat gently, stirring frequently, until the sugar has completely dissolved.

Bring to the boil and boil rapidly for about 15 minutes or until setting point is reached.


Leave to cool for 5 minutes then stir in the stem ginger.


Pour into warm sterilized jars and cover with waxed discs. When completely cold, cover with cellophane or lids, label and store in a cool place.
(note: I haven't been able to find waxed discs, so I just pour the marmalade into jars and put the lid on.)
Sugar: the type of sugar you use is important. Preserving sugar should be used with fruits that have a high pectin content - the large sugar crystals allow the water to move freely between the crystals on the base of the pan, reducing burning and creating less froth and scum during boiling. Jam sugar has a balanced amount of natural pectin and citric acid, which helps fruits with a low pectin content to set.
This recipe came from a book called "Jams and Preserves", by Gina Steer. It is a lovely book (the tomato chutney I made a while ago came from this book too) and is one my sister gave me for my birthday. So off I went to the local market on a Saturday morning and came back with fresh limes, ginger and lemons.
Ginger Citrus Marmalade
makes about 1.3kg / 3lb

4 limes (preferably unwaxed), scrubbed
2 large lemons (preferably unwaxed), scrubbed
small piece fresh root ginger, peeled and chopped.
1.2 litres / 2 pints water
2 tsp ground ginger
about 900g / 2lb preserving sugar (see method) (I couldn't find preserving sugar, so used jam sugar instead. The type of sugar is quite important, I will explain at the end)
115g / 4oz stem ginger, chopped. (I presumed this was crystallised ginger, which was all I could find).

Cut off and discard both ends from the limes and lemons and wash thoroughly. Place in a large saucepan together with the chopped root ginger and the water. Bring to boil then reduce heat, cover with a tight-fitting lid and simmer for 1 1/2 hours, or until the fruits are very soft.

Cool slightly, then drain off liquid and reserve. Chop the fruits as finely as possible, discarding the pips.


Return the chopped fruits to the rinsed out saucepan, together with the reserved liquid and ground ginger. Add the sugar, allowing 450g/1 lb sugar for every 600ml / 1 pint of liquid. Heat gently, stirring frequently, until the sugar has completely dissolved.

Bring to the boil and boil rapidly for about 15 minutes or until setting point is reached.


Leave to cool for 5 minutes then stir in the stem ginger.


Pour into warm sterilized jars and cover with waxed discs. When completely cold, cover with cellophane or lids, label and store in a cool place.
(note: I haven't been able to find waxed discs, so I just pour the marmalade into jars and put the lid on.)
Sugar: the type of sugar you use is important. Preserving sugar should be used with fruits that have a high pectin content - the large sugar crystals allow the water to move freely between the crystals on the base of the pan, reducing burning and creating less froth and scum during boiling. Jam sugar has a balanced amount of natural pectin and citric acid, which helps fruits with a low pectin content to set.
"Scrapbooking" recipes
So, after being inspired by an arty recipe swap I took part in recently, I decided to scrapbook my recipes.
 |
My recipes folder |


You will need:
A ringbinder
A selection of paper:
Scrapbooking paper
plain A4 paper (coloured)
Scraps of paper, plain or printed
Paper napkins and doilies are also useful.
Plain white photocopy paper
Glue
Craft knife
Ruler
Guillotine (very helpful but not essential)
A cuttlebug (or any die-cut machine) is great for embossing and die-cutting shapes, letters, tags, etc, but again, not essential.
A variety of stamps and hole punches (eg hearts, dragonfly, butterfly, or whatever you have).
Paints / inks / watercolour pencils / colouring pencils / crayons etc.


Choose a selection of paper to cover your ringbinder with.
Measure the spine, allowing for a 1 inch allowance around all sides. Measure your paper, and use a ruler and craft knife (or guillotine) to cut to fit. Before gluing, line it up along the spine and make pencil marks so you know where to put it and fold the paper over the edges.
Glue onto spine, turning over and glueing down the top and bottom onto the inside of the ringbinder.
Measure the front of the ringbinder, giving yourself a 1 inch/4cm allowance around the 3 edges of the ringbinder (top, bottom, and side). Cut your paper to fit, lining it up along the edge of the spine. Make pencil marks on the wrong side of your paper, so you know where it fits. Fold paper over the edges to crease.
For the corners, open your paper back up again (after folding and creasing). Bring the corner of your paper over the corner of the ringbinder to make a triangle. Press down to make a sharp crease. Then fold one side of the paper up and over, and repeat with the other side. When all your creases have been made, apply glue to your paper and carefully glue onto the front of your ringbinder first, smoothing out as you go to avoid any air bubbles or creases. Turn over and glue your corners down first, then glue the sides. Repeat with the back of the ringbinder.
Cut paper to fit the inside of your ringbinder. You may like to use small squares and piece them together to fit (like patchwork) or use a large piece of paper to cover.


Get out the plain A4 photocopy paper, and paint / stipple / smear / sponge / draw / use crayons. This is your background. It doesn't have to be perfect. You may like to use a touch of gold or iridescent paints over your base colour. You may like to use watercolour paints (or watered down acrylics) then draw into the wet paint using watercolour pencils. Lay them out to dry then paint the other side.

Sort out your recipes. Cut them out and trim them up. I have pasted mine onto plain paper to give them a border. You can use fancy scissors to trim the edges of the borders.
Once this is done, sort them out into how you want to group them: desserts together; icecreams; chutneys and sauces together; pasta dishes; entrees; dips and snacks; etc.
I lay out my painted backgrounds over the floor and then place the recipes on them.
Start experimenting with layouts. If the recipes come with pictures, you may like to put them next to the recipe.
Gather up your pretty papers, napkins, doilies and lay them out on your backgrounds alongside your recipes and work out placement. Cut out strips of decorative paper to use as borders along the edges of your pages. I like using doilies in the corners as a pretty decorative touch. Split the napkins so you just have the top part, tear out the images and lay out on your page.
Once you are happy with the layout, start pasting!


Once the pasting has been done, then you can start embellishing your recipe pages with stamps, punches, motifs, pictures, tags.
Go through magazines to look for pictures you like; draw simple shapes (if you can't draw) such as chillies and strawberries, colour them in and cut and paste.


A ringbinder
A selection of paper:
Scrapbooking paper
plain A4 paper (coloured)
Scraps of paper, plain or printed
Paper napkins and doilies are also useful.
Plain white photocopy paper
Glue
Craft knife
Ruler
Guillotine (very helpful but not essential)
A cuttlebug (or any die-cut machine) is great for embossing and die-cutting shapes, letters, tags, etc, but again, not essential.
A variety of stamps and hole punches (eg hearts, dragonfly, butterfly, or whatever you have).
Paints / inks / watercolour pencils / colouring pencils / crayons etc.


Choose a selection of paper to cover your ringbinder with.
Measure the spine, allowing for a 1 inch allowance around all sides. Measure your paper, and use a ruler and craft knife (or guillotine) to cut to fit. Before gluing, line it up along the spine and make pencil marks so you know where to put it and fold the paper over the edges.
Glue onto spine, turning over and glueing down the top and bottom onto the inside of the ringbinder.
Measure the front of the ringbinder, giving yourself a 1 inch/4cm allowance around the 3 edges of the ringbinder (top, bottom, and side). Cut your paper to fit, lining it up along the edge of the spine. Make pencil marks on the wrong side of your paper, so you know where it fits. Fold paper over the edges to crease.
For the corners, open your paper back up again (after folding and creasing). Bring the corner of your paper over the corner of the ringbinder to make a triangle. Press down to make a sharp crease. Then fold one side of the paper up and over, and repeat with the other side. When all your creases have been made, apply glue to your paper and carefully glue onto the front of your ringbinder first, smoothing out as you go to avoid any air bubbles or creases. Turn over and glue your corners down first, then glue the sides. Repeat with the back of the ringbinder.
Cut paper to fit the inside of your ringbinder. You may like to use small squares and piece them together to fit (like patchwork) or use a large piece of paper to cover.


Get out the plain A4 photocopy paper, and paint / stipple / smear / sponge / draw / use crayons. This is your background. It doesn't have to be perfect. You may like to use a touch of gold or iridescent paints over your base colour. You may like to use watercolour paints (or watered down acrylics) then draw into the wet paint using watercolour pencils. Lay them out to dry then paint the other side.

Sort out your recipes. Cut them out and trim them up. I have pasted mine onto plain paper to give them a border. You can use fancy scissors to trim the edges of the borders.
Once this is done, sort them out into how you want to group them: desserts together; icecreams; chutneys and sauces together; pasta dishes; entrees; dips and snacks; etc.
I lay out my painted backgrounds over the floor and then place the recipes on them.
Start experimenting with layouts. If the recipes come with pictures, you may like to put them next to the recipe.
Gather up your pretty papers, napkins, doilies and lay them out on your backgrounds alongside your recipes and work out placement. Cut out strips of decorative paper to use as borders along the edges of your pages. I like using doilies in the corners as a pretty decorative touch. Split the napkins so you just have the top part, tear out the images and lay out on your page.
Once you are happy with the layout, start pasting!


Once the pasting has been done, then you can start embellishing your recipe pages with stamps, punches, motifs, pictures, tags.
Go through magazines to look for pictures you like; draw simple shapes (if you can't draw) such as chillies and strawberries, colour them in and cut and paste.


This is a work in progress! I have chosen not to laminate my pages, but to keep them in plastic pockets, so I can write on them or add things to them over time as I wish.
Subscribe to:
Posts (Atom)